This is a big post. There’s a lot to say about indigo (way more than I know or have experience with), but even for my first foray into the indigo world, I learned a lot.
Indigo was something I wanted to try down the road, and had no plans to get into right away. While I dip my toe in the natural dyeing waters, my whole mantra (as I’ve said in these posts before) is to keep it simple at first, then build, adding one variable at a time. Indigo seemed like a big, scary thing (honestly), with a lot of variables that I didn’t necessarily understand. What pushed me to try it though, were some kind suggestions by experienced natural dyers (including Andrea of Fox Print Fibres – check out her shop, she weaves some amazing magic with natural dyes). I also really, really wanted to fix my skeins from my Logwood exhaust & osage disaster. Indigo seemed like a pretty sure-fire way to fix them, I just had to wrap my head around the whole process first.
I will say, I took a bit of an easy way out for my first indigo experiment – I started with pre-reduced indigo, rather than creating a stock solution from the plant itself to go into the vat. Creating that stock solution is still what I’m trying to wrap my head around, and while I’m eager to learn, I think that’ll be in the “next year” box when I can get elbow deep (so to speak). So I went to an art store close to where I live, and lo and behold, they had everything I needed! I grabbed some pre-reduced indigo, some soda ash, and some hydro (sodium hydrosulfite).
A Word On Safety
With the indigo dyeing procedure, you are dealing with chemicals. Soda ash is an alkaline, which can cause skin irritation. Hydro is an irritant to the skin as well, and can be harmful if breathed in. Hydro can also be flammable, and can combust if exposed high heat, sparks or fire. I don’t say this to scare you off – but there are precautions to take. Wear a mask and gloves, and eye protection if you want to be really careful. Don’t do any mixing or storage by things that may spark or emit high heat (so, don’t keep your hydro next to a stove or space heater).
Another tip – add your soda ash and hydro (or whatever reducing agent you use) to water, and not the other way around. This will reduce the likelihood of dust partials rising up from the powdered forms your using (so you don’t breathe them in).
Recipe for the vat
- 20g of pre-reduced indigo
50g of hydro
100g of soda ash
You absolutely do not have to use this exact recipe (but it does fit nicely in a 5 gallon paint bucket). Supposedly this will do about 5lbs of fabric/textiles, but I noticed a distinct change in colour at about the 3.5-4lb mark.
The ratio I followed is 1:2:4 (1 part pre-reduced indigo, 2 parts hydro, 4 parts soda ash). I was a wee bit off (strictly following that recipe I should have used 25g of indigo), but that ratio is pretty solid.
Materials
Indigo dyeing takes a few more materials than natural dyeing in the kitchen, so here’s my arsenal of tools that I set up before I got going:
- 5 gallon paint bucket and lid
Gloves
N95 dust mask (for mixing the powdered ingredients)
Drop cloth (to cover the area where I would be dyeing)
48″ Stir stick (just a piece of balsa wood – long enough to reach the bottom of the bucket with lots of handle room)
3 bowls dedicated to indigo dyeing (1 for indigo, 1 for soda ash, and 1 for hydro, so I can pre-measure and have them ready to go into the water).
Setting Up the pre-reduced vat
What I’m starting with is a granular pre-reduced indigo, a bag of soda ash, and the hydro. The pre-reduced indigo only needs to go into the vat, but it was still in pretty good chunks (think something about the size of coarse sea salt). I wanted it to dissolve in the water, so I crushed it up more with a mortar and pestle to get it a lot more fine.
I measured out my weights of all my ingredients and set them off to the side. I took my paint bucket, and filled it with about 4 gallons of warm water (about 55C) and brought it out to my dyeing area. I first added my measured hydro and soda ash, and carefully and slowly stirred the mixture in a clock-wise motion until they were dissolved. Then I took the indigo, and still stirring slowly in a clockwise motion, I poured that in.
At this point, the colour of the water turned greenish, which is what we want! I started to notice a small amount of bubbles forming at the top too (called the bloom) – also good! This is the hydro taking some of the dissolved oxygen out of the water (more on that below), which we want to make the indigo dye work its magic.
Timing
Indigo is all about timing and number of dips. Unlike other natural dyeing methods, where you (generally) plop your textile into the water and wait to get your colour, indigo benefits from shorter but several dips into the same bath to achieve a darker colour.
I read a lot about indigo before trying this first vat – and everything I read said for darker colours do more dips. Leaving your textile in the vat longer, while producing a darker colour, might not produce the subtlety of shade you want. I wanted those subtle shade differences, so I set aside a group of skeins that were all spun at the same time from the same fibre, and dedicated those to creating a gradient using the short but several dips method.
Then we have the oxidization process in between dips. Because the hydro pulls oxygen out of the water, so the indigo can work its magic and permeate the textile, when you first pull those skeins out they look more greenish than blue. So what you do, is allow the oxygen to work its way back into the dye, and before your eyes you see the colour go from a greenish blue to indigo blue (it’s very cool to watch). I’ve read lots of different timings for this oxidization process. Some use the time of the dip to dictate the time of the oxidization (so a five minute dip calls for a five minute oxidization). I’ve read people who do a set time every time, no matter how long the dip. For me, I went with a 15-20 minute oxidization, regardless of the dip time. From what I understand, you can get too much oxidization, and I wanted time to be able to set the skeins out, oxidize, then move them around to make sure all surfaces were being got at by the air.
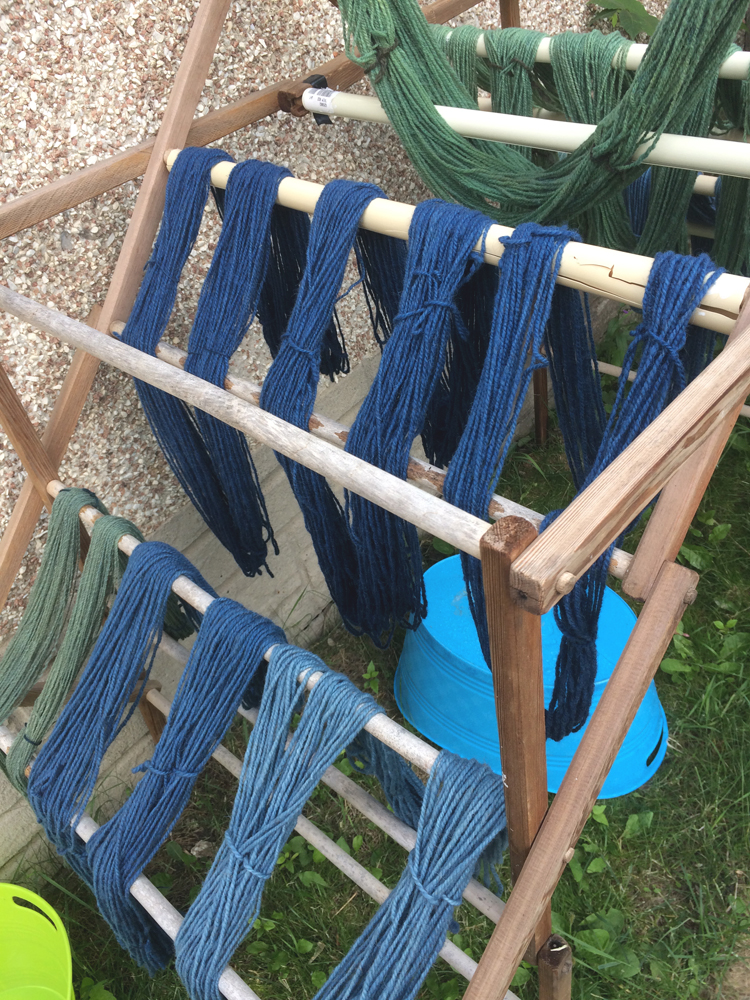
Let’s look at the photo from the top of the post:
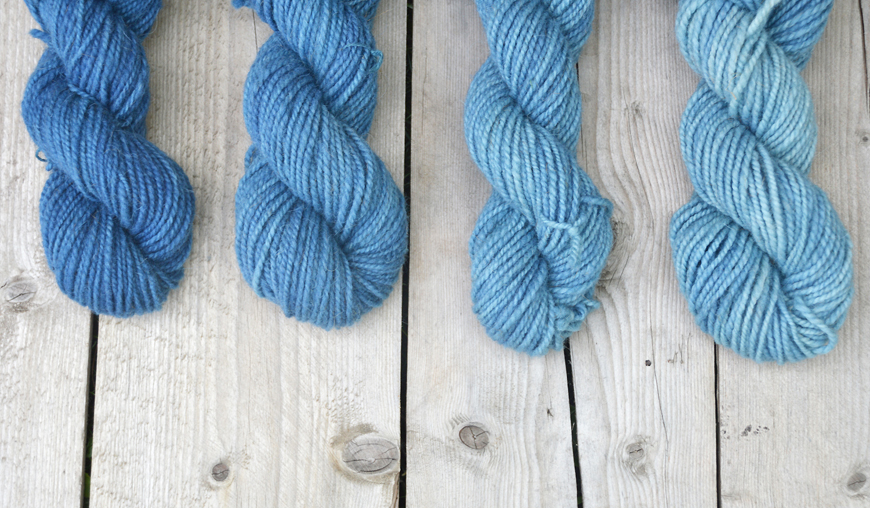
These are four skeins of aran weight 2-ply Tunis I spun up a few months ago. From left to right these were my times:
- 1st skein: 2 dips at 5 minutes each
2nd skein: 2 dips at 2 minutes each
3rd skein: 1 dip at 2 minutes
4th skein: 1 dip at 1 minute
All skeins had a 20 minute oxidization between their dips.
The 4th skein, because of such a quick dip (and possibly a tiny bit of lanolin still left in the skein) I got a very slight uneven colouring. The roving I used was made at a mill here in Alberta, and if I were to do such a short dip again from a commercial source, I’d scour the skeins before dyeing. I say commercial, only because I’m pretty fastidious in my own scouring process to get the lanolin out, and I’m pretty confident that what I’ve washed and prepped myself is pretty clean (if not, I can tell during the spinning process).
Let’s Talk Mechanisms
There’s a whole lot going on in an indigo vat. There are a few things you absolutely need: no dissolved oxygen (which is free-floating O2 not part of the H2O compound), and an alkaline solution (think pH 10-11). Indigo won’t adhere to textiles if there’s oxygen and a basic or acidic solution during the submersion process, hence the reducing agent and soda ash.
There’s a really, really great (and thorough) explanation of the vat and how it works right here, but for our purposes I just want to quote a specific section of the text:
The indigo pigment molecule, as purchased, will not react with cloth or dye it. It can be rubbed in and will cause a temporary stain, but it is not dye. […] The Vat must fulfill two conditions to properly modify the Indigo, it must first have an elevated pH, a condition know(n) (sic) as alkalinity in which the amount of OH− ions exceeds that of H+ ions in the solution. Second, the Vat must be a reduced solution, meaning (in this case specifically) that the solution is devoid of dissolved oxygen and there are an excess of electrons in solution which causes the oxygen atoms present on the indigo molecule to be reduced (essentially snatching up these electrons into their orbit) and changing the Indigo molecule into what is called Leuco-Indigo which becomes dissolved in the Vat solution. This change is easily visually confirmed! Leuco-Indigo will appear as a transparent yellow-green (not too dissimilar from a childhood favorite soda, Mountain Dew) as compared to the opaque dark blue of Indigotin in suspension.
So now that we’ve pulled out that extra dissolved oxygen out of the mix, causing the solution to grab oxygen from the indigo molecules themselves, we need to reintroduce the indigo molecules to air so they in turn grab what they lost in the vat. This is why the solution – and your skeins when you first pull them out – look greenish rather than blue.
I like to take the skeins out, set them down, then in about 10 minutes come back and move them around, to make sure the air is permeating all the plies of the yarn equally. Referring to the quotation above – what we’re doing at this moment is re-introducing the oxygen that was snatched up in the vat from the indigo molecules and binding them back into the indigo molecules and your textile.
Ta-da! Science and art harmoniously at work.
Now I am 100% not a chemist (not even close), but I am technically minded. If I can wrap my head around the mechanism, I can do the thing better than I could otherwise. For those of you like me, I hope that made what’s actually going down in that vat of yours make sense.
Thoughts & What I Learned
Check Out Some Resources
This is by no means an exhaustive list on indigo dyeing. But these are a few interesting snippets I found on the web:
A Maiwa Guide to Indigo
Indigo Vat Basics (from textile designer Graham Keegan)
True Blue: Indigo Dyeing in Japan – a fantastic mini-documentary (less than 3 minutes) about an operating traditional indigo farm, and a traditional dyer in Japan.
Wild Colour by Jenny Dean and Karen Diadick Casselman. This is a touchstone book for natural dyeing in general, but the sections on indigo are also extremely good.
Next up will be part two – about fixing mistakes, overdyeing, and further thoughts on indigo dyeing and my first vat.